How to Master the Sand Molding Process for Better Casting?
The sand molding process plays a crucial role in the casting industry, which contributes significantly to manufacturing. According to a report by the American Foundry Society, around 70% of metal castings are produced using this technique. Mastering the sand molding process can lead to enhanced productivity and quality.
Expert metallurgist Dr. Emily Carter emphasizes, "Understanding the intricacies of the sand molding process is essential for achieving consistent results." Her insights highlight the importance of technique and precision in creating molds. Even experienced professionals can face challenges such as sand quality or moisture content, leading to potential defects in cast products.
Reflecting on past projects, many foundries recognize the need for improvements in their sand molding techniques. Consistent training and updates in technology can help address these gaps. By mastering this process, companies can optimize their operations and increase overall efficiency in casting production.
Understanding the Basics of Sand Molding in Metal Casting
Sand molding is a crucial technique in metal casting. It involves creating molds from sand, which then shape the molten metal into desired forms. Understanding the composition of sand is important. Different sand types can affect durability and detail. For instance, fine sand offers better detail but less strength. Coarse sand provides strength but may sacrifice detail.
When working with sand molding, preparation is key. Make sure the sand is evenly mixed. Poorly mixed sand can lead to defects. Try to keep the moisture levels consistent. Too much water can cause the mold to collapse, while too little can lead to cracks.
Tip: Test your sand mixture with a small mold first. This can save time and materials. Watch for air bubbles or uneven surfaces. These can be signs of problems. Adjust your technique accordingly. Remember, learning is part of the process. There may be failures before achieving the perfect cast. Don't hesitate to reflect on what went wrong and how to improve.
Choosing the Right Sand and Additives for Optimal Molding
Choosing the right sand and additives is crucial for quality sand molding. According to a 2021 industry report, about 80% of casting defects arise from improper molding material. Sand types vary significantly, affecting the molding process and final product. Silica sand remains popular due to its high melting point and good thermal stability. However, alternative materials like zircon sand offer better resistance to thermal shock.
Additives play a critical role in enhancing mold properties. For instance, bentonite clay is often used to bind sand particles. This improves mold strength and flexibility. A study indicated that using 6% bentonite increases mold strength by 25%. Other additives, like carbonaceous materials, can prevent oxidation in ferrous castings. They create a protective layer during the molding process. However, finding the right balance is challenging. Too much additive can compromise sand flowability, leading to inclusions.
Mold preparation requires careful consideration of environmental conditions. Humidity affects sand properties. High moisture content can lead to sticky molds, which may distort shapes. Conversely, low humidity can result in dry sand, leading to cracks. Each casting situation presents unique challenges. Continuous experimentation and adjustment are necessary to refine the process for optimal results. Understanding these factors can significantly improve casting quality and reduce defects.
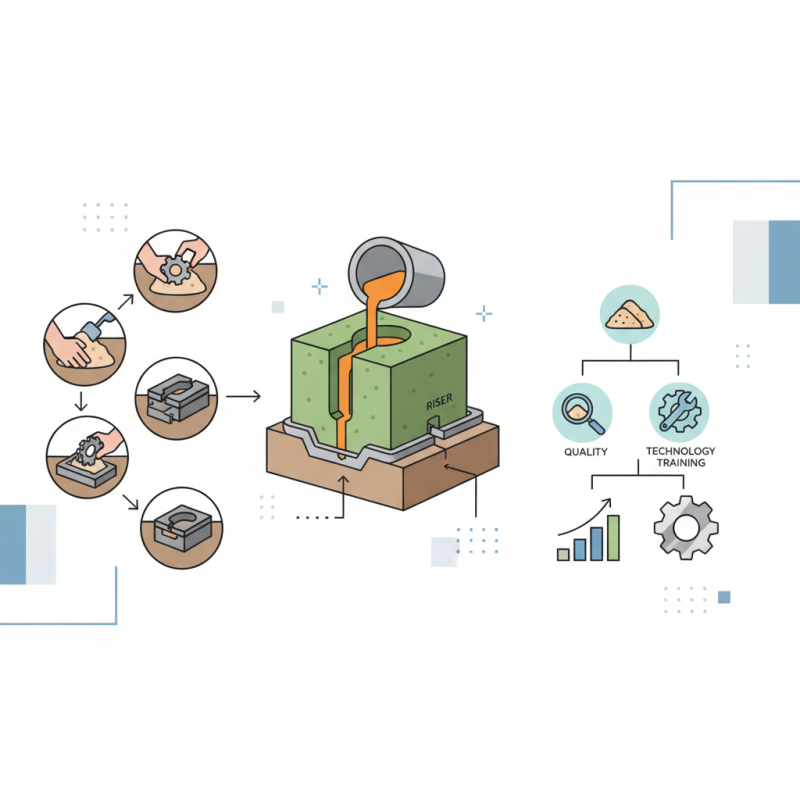
Step-by-Step Guide to Creating a Sand Mold
Creating a sand mold is crucial for effective casting. The right technique can significantly improve casting quality. The process begins with selecting the proper sand mixture. Studies suggest that a mixture of 70% sand, 20% clay, and 10% water yields optimal results. However, finding the perfect blend can be tricky. Each foundry may require adjustments based on specific needs.
Once the mixture is ready, shape the sand using a mold box. Make sure to compact the sand evenly. Inconsistent pressure may lead to defects in the mold. Additionally, adding a release agent can improve mold removal. It prevents the metal from sticking, but using too much can damage the mold.
After forming, check for air holes or weak spots. These imperfections can be detrimental. According to industry reports, up to 25% of castings fail due to such flaws. Taking time to inspect and rectify these issues is necessary. Cast with care; every detail matters.
How to Master the Sand Molding Process for Better Casting? - Step-by-Step Guide to Creating a Sand Mold
| Step | Description | Materials Needed | Time Required |
| 1 | Prepare the pattern | Pattern material (wood, metal) | 1-2 hours |
| 2 | Create the sand mixture | Sand, clay, water | 30 minutes |
| 3 | Pack the sand around the pattern | Prepared sand mixture | 1 hour |
| 4 | Remove the pattern | Hand tools | 30 minutes |
| 5 | Assemble the mold parts | Mold parts, clamps | 1 hour |
| 6 | Pour the molten metal | Molten metal, pouring equipment | Varies |
| 7 | Cool and break the mold | Cooling area | 1-2 hours |
| 8 | Finishing touches | Tools for trimming and polishing | 1 hour |
Techniques for Improving Mold Strength and Stability
Mastering sand molding is an art. Achieving mold strength and stability is vital. Here are some practical techniques to improve your process.
Using the right type of sand is crucial. Fine sand helps in detail but may lack strength. Coarse sand offers strength but can struggle with detail. Finding a balance is key. Additives like clay and water can enhance binding. A common mix is 5% clay with enough water to create a dough-like consistency. This aids cohesion and improves mold integrity.
Compacting the sand properly is another essential step. Insufficient compaction leads to weak spots. Use a tamper or vibrations to compress the sand evenly. Aim for uniform thickness across the mold. This reduces the risk of cracks during pouring. Even when done correctly, imperfections may arise.
Consider the curing process too. Moisture can weaken molds over time. Allowing molds to air dry can improve strength. Monitor humidity levels in your working environment. Small changes can lead to significant improvements. Regularly revisit your techniques for better results. Reflect on what works and what doesn't. Perfecting sand molding is an ongoing journey.
Common Pitfalls to Avoid in the Sand Molding Process
In mastering the sand molding process, avoiding common pitfalls is crucial. Many beginner molders underestimate the importance of moisture content. Too little moisture leads to fragile molds, while too much creates sticky, unusable sand. The right balance is key. Regularly checking this aspect can prevent significant issues down the line.
Another frequent error involves the use of inappropriate sand types. Each project demands specific sand grain sizes and compositions. Using the wrong type can result in poor detail reproduction. It’s essential to experiment and observe the results closely.
Additionally, neglecting to properly compact the sand can ruin your molds. Insufficient compaction may cause inaccuracies in the final cast. It is easy to overlook this step, but the impact is often detrimental. Don't rush; take the time to ensure every mold is compacted correctly. Aim for precision, even if it takes longer. Mistakes can teach valuable lessons, so reflect on what went wrong. Embrace these moments for growth.
Common Pitfalls in the Sand Molding Process